Most traders worship indicators like they’re some magic button. They’re not.
Indicators are tools. That’s it. They don’t predict the future. They just help you measure what’s already happening.
Here’s the truth: markets don’t care about your RSI, your MACD, or your perfect Bollinger Band setup. One surprise from the Fed or ECB and your chart looks like a crime scene.
So what do you do?
You stack the odds. You learn the nine indicators that every professional keeps in their arsenal, not because they’re flawless, but because they give you structure. They help you filter noise, time entries, size risk, and stay alive long enough to actually get consistent.
This is not a list of shiny toys. It’s the foundation. Master these, and you stop trading like a gambler and start operating like a professional.
1. Moving Averages (Simple & Exponential)
A moving average is exactly what it sounds like: the average price of a market, “moving” forward one bar at a time. Instead of staring at jagged candles, you smooth the noise into a clean line that shows the underlying trend.
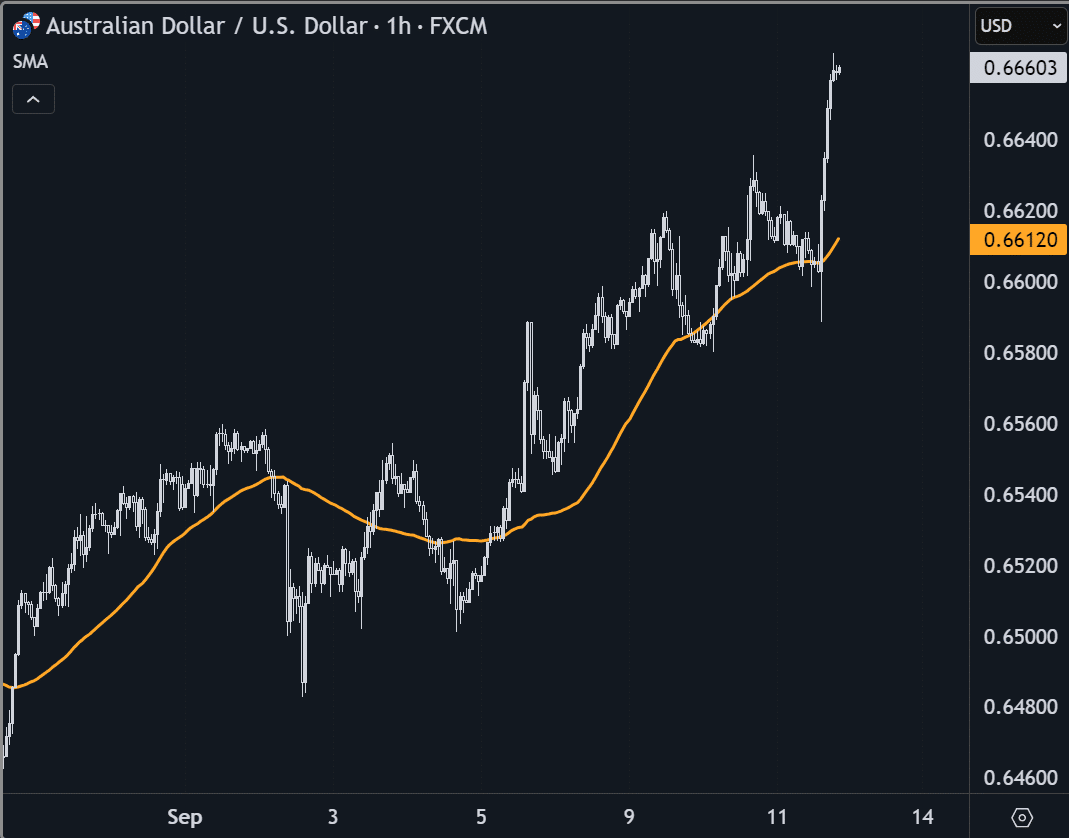
- Simple Moving Average (SMA): adds up the closing prices of X periods and divides by X. Example: a 50 SMA is the average of the last 50 closes.
- Exponential Moving Average (EMA): does the same, but gives more weight to recent prices, so it reacts faster to shifts.
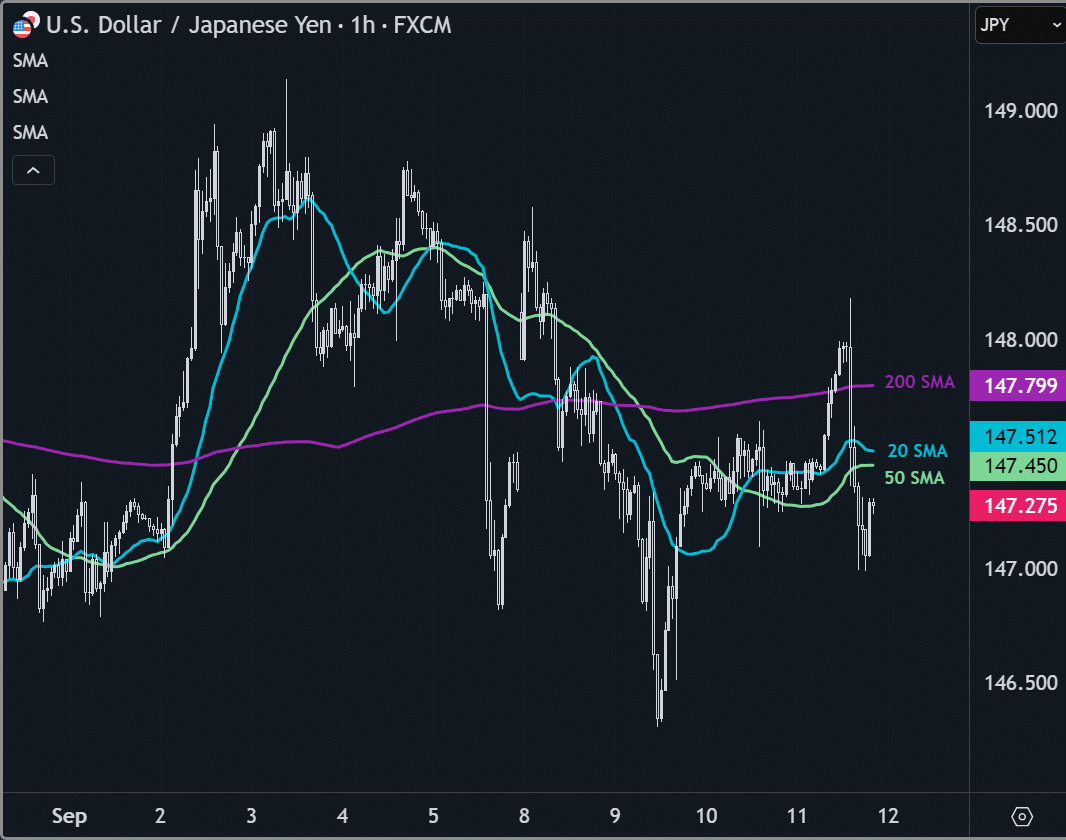
This is why MAs matter: they’re not predicting the future — they’re giving you a statistical baseline of what price has been doing. That’s why hedge funds, prop traders, and retail all look at the same numbers (20, 50, 200).
Why it’s useful (if you actually know how to use it):
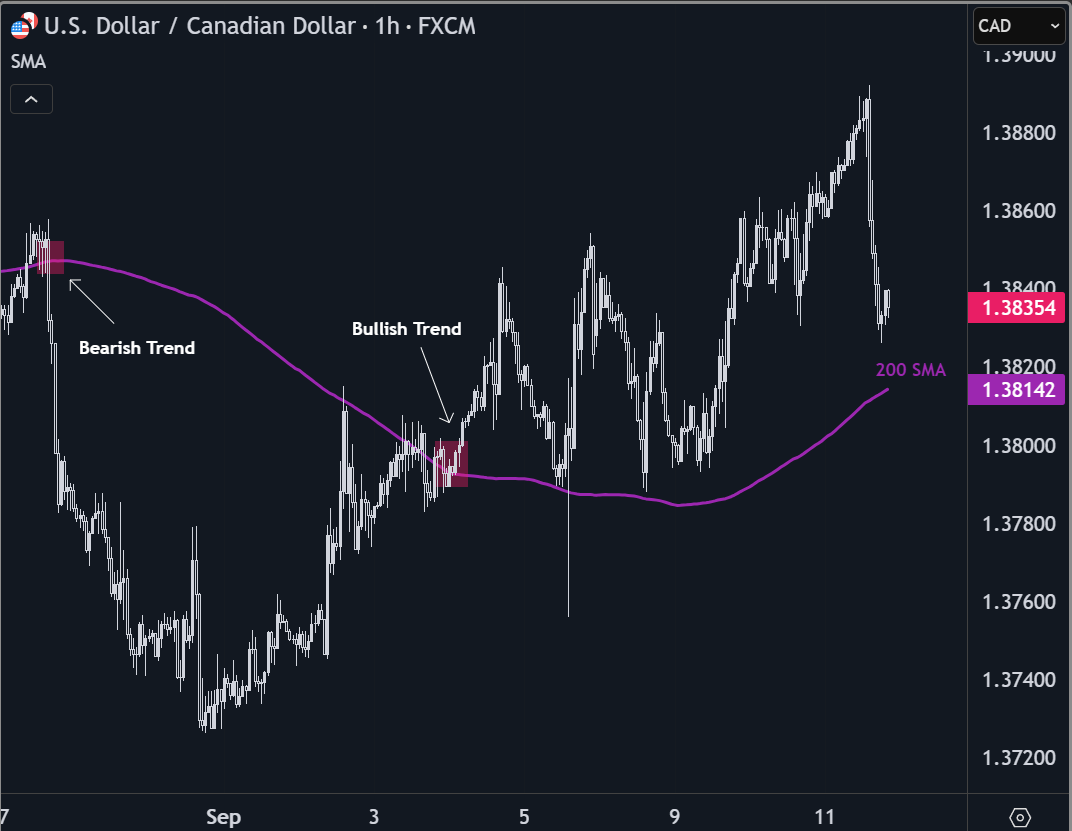
- Define trend direction: price above the 200 SMA = bullish bias; below = bearish.
- Act as dynamic support/resistance. Price loves to bounce around the 20/50 EMAs in trends.
- Anchor your trading plan with structure — you stop guessing and start aligning with the flow.
What kills traders:
- Treating moving averages like magical signals. They lag. By the time a crossover happens, the move is often halfway done.
- Trading them in sideways markets. In chop, price slices through your MAs over and over and destroys your confidence.
How pros actually use them:
- Slow MA (200 SMA): long-term bias.
- Medium MAs (50, 20 EMAs): trend structure and pullback entries.
- Combine with volatility (ATR) or strength (ADX) filters to avoid chop.
- Think of MAs as a map: they tell you where the highway is. You still need judgment to know when to hit the gas.
2. Relative Strength Index (RSI)
The Relative Strength Index is a momentum oscillator. It measures the speed and size of price changes over a set period (default = 14). The result is a value between 0 and 100.
- Above 70 = traditionally “overbought.”
- Below 30 = traditionally “oversold.”
- But smart traders adjust ranges: in strong uptrends, RSI usually bottoms at 40–50; in downtrends, it tops at 50–60.
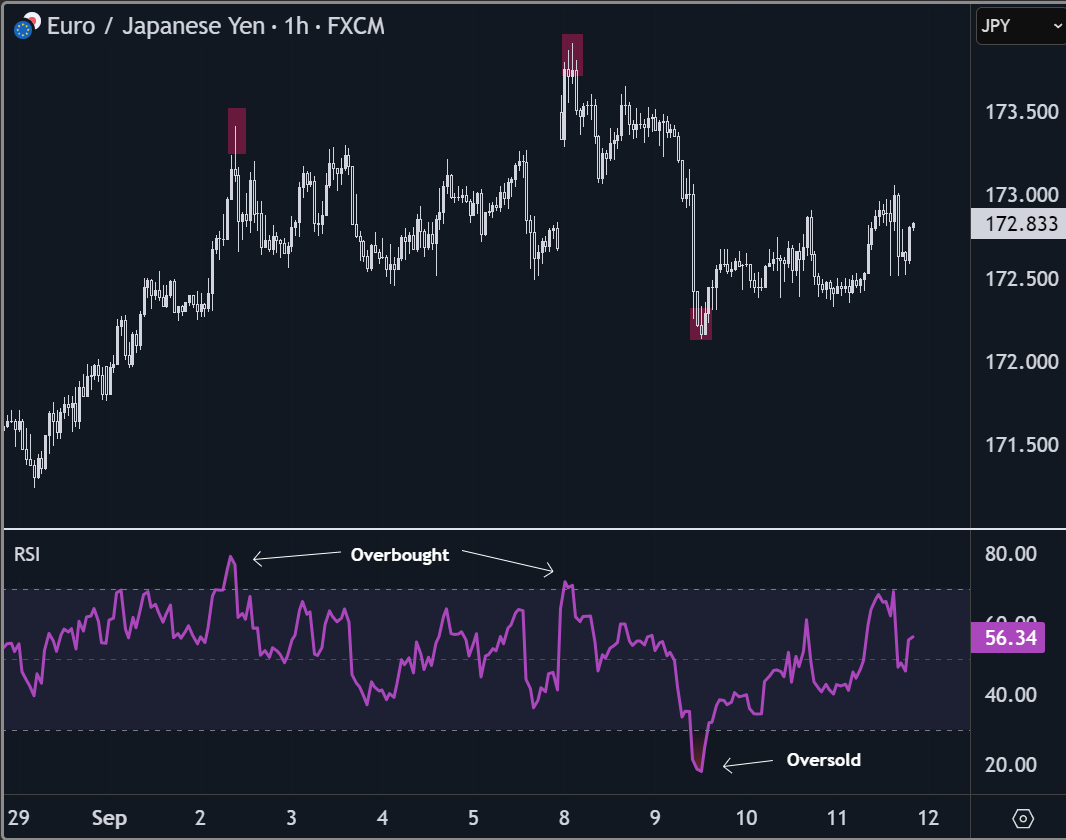
So RSI doesn’t tell you “what’s next.” It tells you how stretched the current move is compared to recent history. That’s why pros use it to time entries, not to predict reversals.
Why it’s useful:
- Quickly shows momentum extremes.
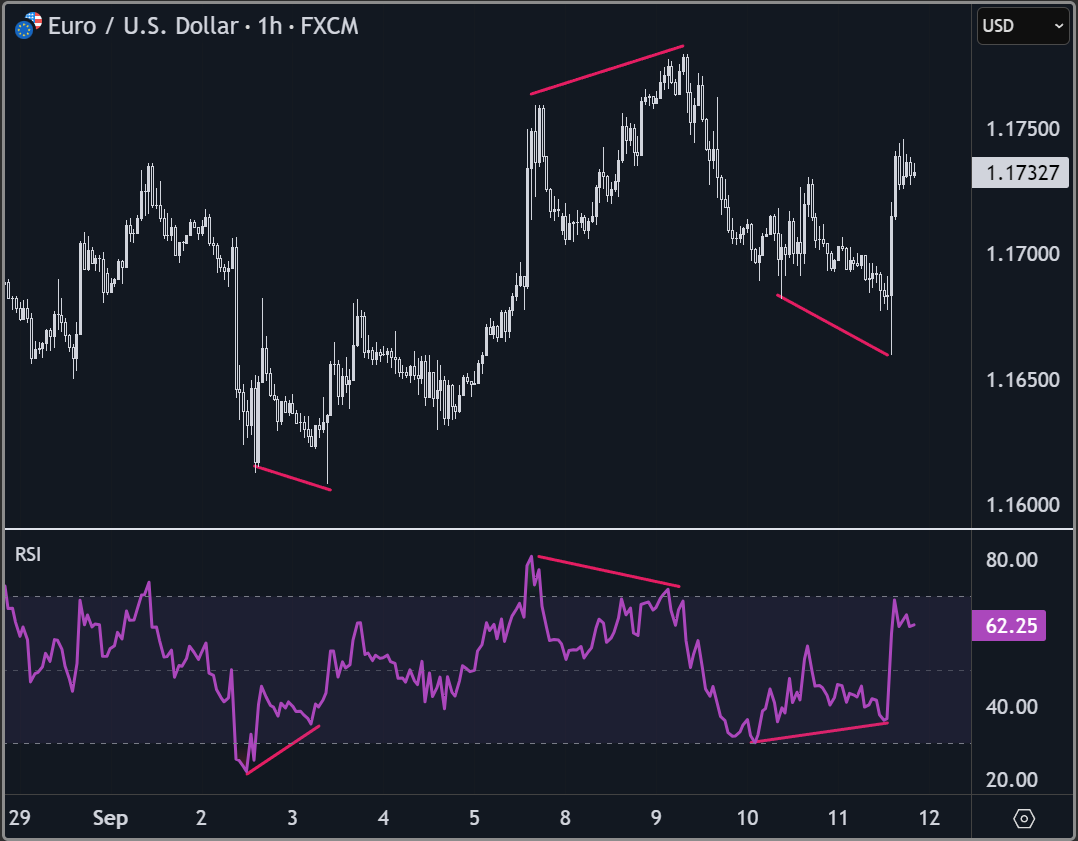
- Spot divergences (price makes a new high, RSI doesn’t → momentum is weakening).
- Great at filtering market conditions: is this a strong trend (RSI lives between 40–80) or a choppy range (RSI swings 30–70)?
What kills traders:
- Taking every “overbought” reading as a sell signal. In strong uptrends, RSI can live above 70 for weeks while price keeps running.
- Ignoring context — RSI in isolation is a trap. Without trend direction, you’ll short every rally in a bull market and blow up.
How to actually use it:
- In ranges: fade extremes (sell near 70, buy near 30) — but only with confirmation from price structure.
- In trends: use RSI “bull/bear ranges.” Example: in an uptrend, buy when RSI dips to 40–45 and turns back up.
- Combine with moving averages or ATR to confirm bias and manage risk.
- Watch for divergences at key levels — they often signal the start of bigger reversals.
3. Bollinger Bands
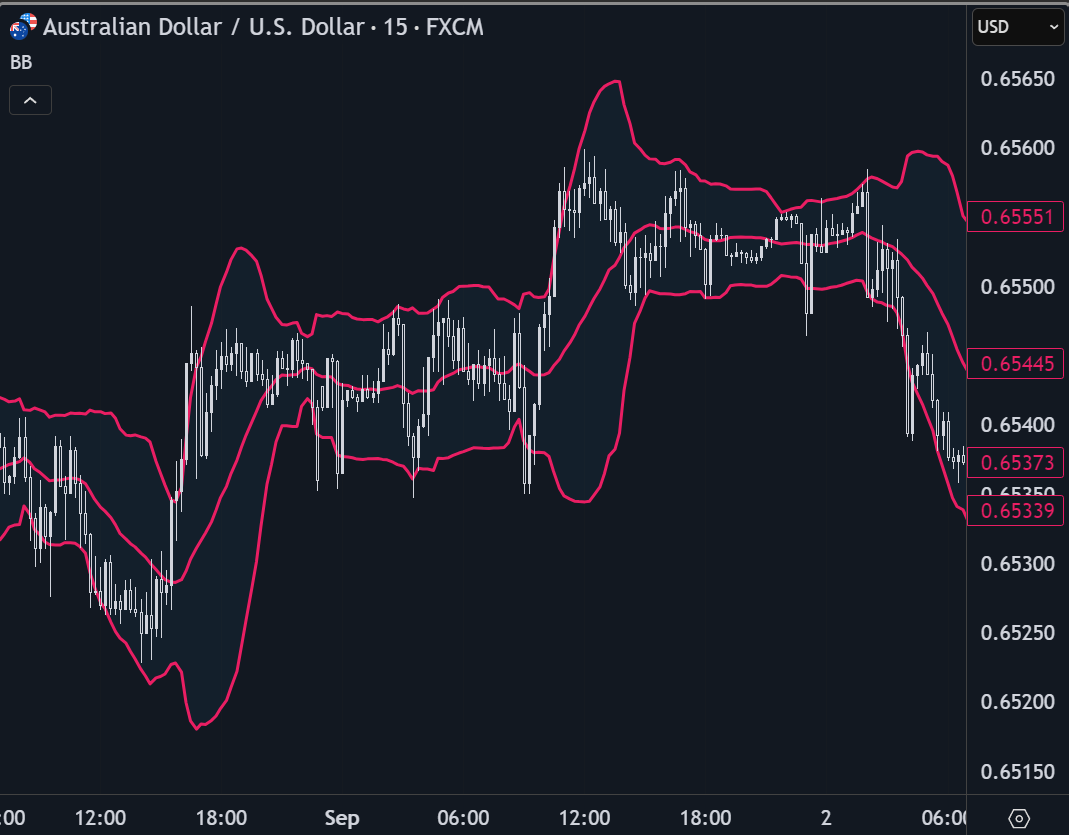
Bollinger Bands are a volatility indicator. They take a 20-period moving average (the “middle band”) and plot two lines above and below it, each 2 standard deviations away. Those outer bands expand when volatility rises and contract when it falls.
In plain English: Bollinger Bands show you whether price is stretched or compressed compared to its recent average.
Why it’s useful:
- Range markets: price tends to snap back toward the middle band after hitting the outer band.
- Trend markets: bands “ride” the move, and price walks the outer band without mean-reverting.
- Breakouts: when the bands squeeze tight, volatility is loading. Breakouts often follow.
What kills traders:
- Fading every touch of the outer band. In a strong trend, price can hug that band while you keep shorting and bleeding out.
- Treating the squeeze as a guaranteed breakout direction. It signals expansion, not whether it’ll be up or down.
- Ignoring confirmation. Bands alone are just volatility — you need structure, momentum, or volume for context.
How to actually use it:
- Range play: In low ADX environments, fade moves into the outer band with oscillator confirmation (e.g., Stochastic or RSI).
- Breakout play: Wait for a Bollinger squeeze. Enter only after price closes outside the band with momentum confirmation (MACD or volume spike).
- Trend play: Use the middle band (20 SMA) as a dynamic pullback level in trending markets.
4. Stochastic Oscillator
The Stochastic Oscillator is a momentum indicator. Instead of measuring how fast price is moving (like RSI), it measures where price closed compared to the recent high/low range.
Formula simplified:
- %K = (Current Close – Lowest Low) ÷ (Highest High – Lowest Low) × 100
- %D = a moving average of %K (signal line).
The result is two squiggly lines that oscillate between 0 and 100.
- Above 80 = overbought.
- Below 20 = oversold.
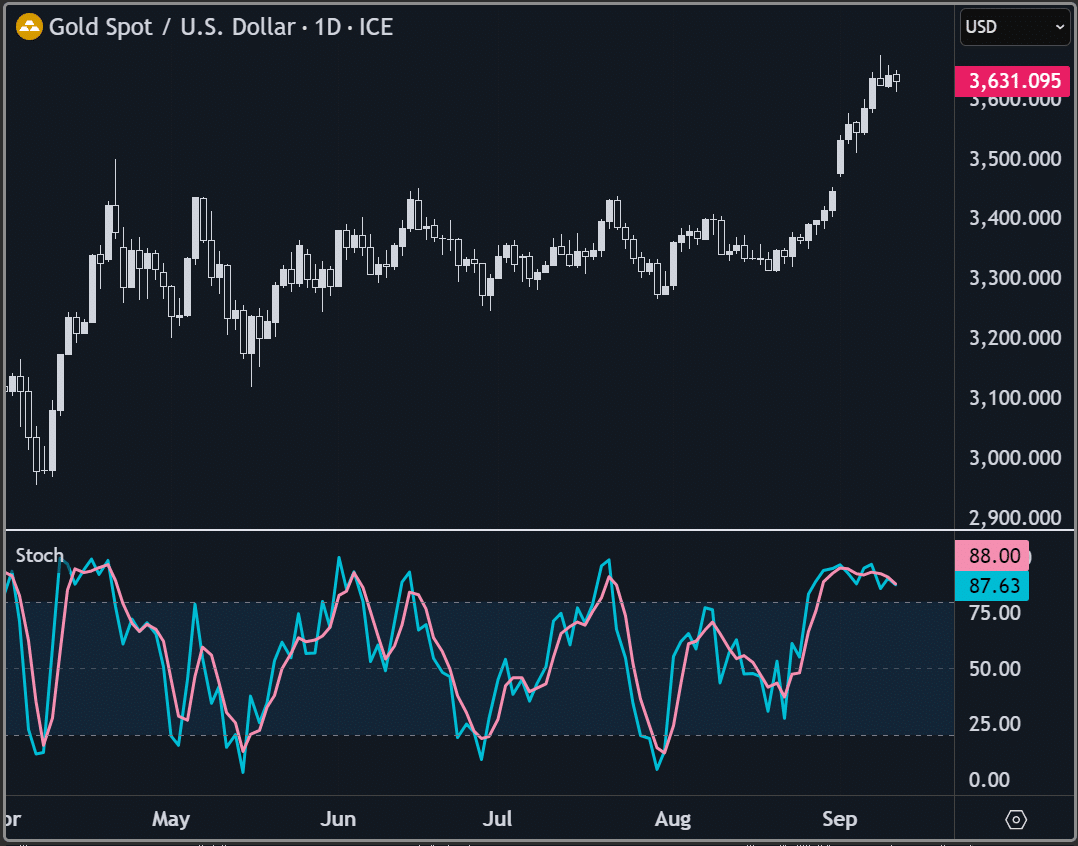
But here’s the authority take: it’s not about “overbought/oversold.” It’s about spotting momentum shifts inside ranges and timing turns earlier than RSI.
Why it’s useful:
- Great for range-bound markets. Price stalls, momentum fades, Stochastic flips — often before RSI or MACD catch up.
- Can give you early entries in pullbacks when combined with trend filters.
- Crossovers between %K and %D at extremes highlight possible turning points.

What kills traders:
- Shorting every time it hits 80 or buying every time it hits 20. In trends, it can stay pinned there for a long time while you blow up.
- Using it standalone. Without trend or volatility context, Stochastics just whipsaw you to death.
- In ranges: fade extremes when %K crosses %D back inside (sell above 80, buy below 20).
- In trends: only take signals with the dominant bias (e.g., uptrend → only buy Stochastic dips below 20 that cross up).
- Pair with Bollinger Bands: double confirmation for range plays (price tags outer band + Stochastic flips).
- Use with ADX: when ADX < 20 (no trend), Stochastic becomes one of your best friends.
5. Moving Average Convergence Divergence (MACD)
The MACD is both a trend and momentum indicator. It takes two exponential moving averages (12 EMA and 26 EMA), subtracts them, and then smooths that difference with a 9 EMA (the “signal line”). The output:
- MACD line (momentum).
- Signal line (trigger).
- Histogram (visual difference, shows acceleration/deceleration).
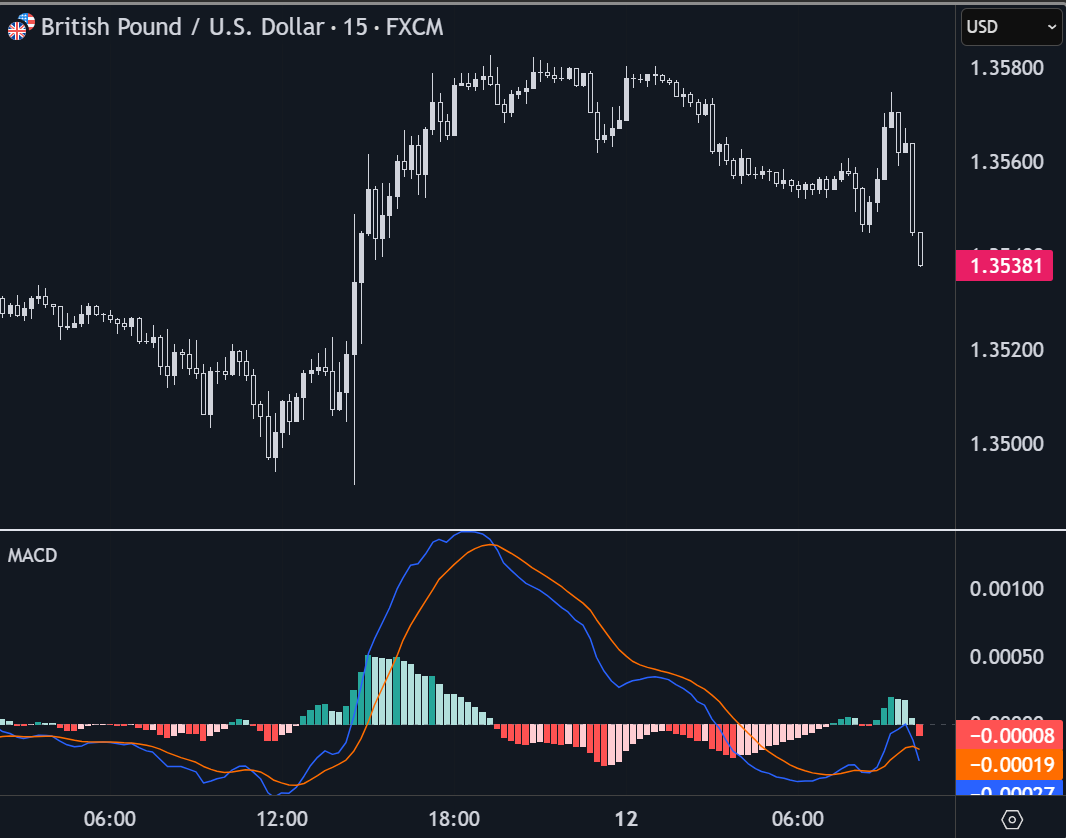
Translation: it tells you if momentum is increasing or fading relative to recent trend.
Why it’s useful:
- Crossovers (MACD line vs. signal line) highlight momentum shifts.
- Histogram expansion signals acceleration — great for confirming breakouts.
- Divergences (price makes new high, MACD doesn’t) are early warnings of trend exhaustion.
What kills traders:
- Treating every crossover as a buy/sell signal. MACD is lagging — by the time it flips, the move may already be halfway done.
- Using it in choppy markets. Sideways price action = endless fake signals.
- Ignoring higher timeframe context. MACD can say “buy” on the 5-minute while the daily is screaming “downtrend.”
How to actually use it:
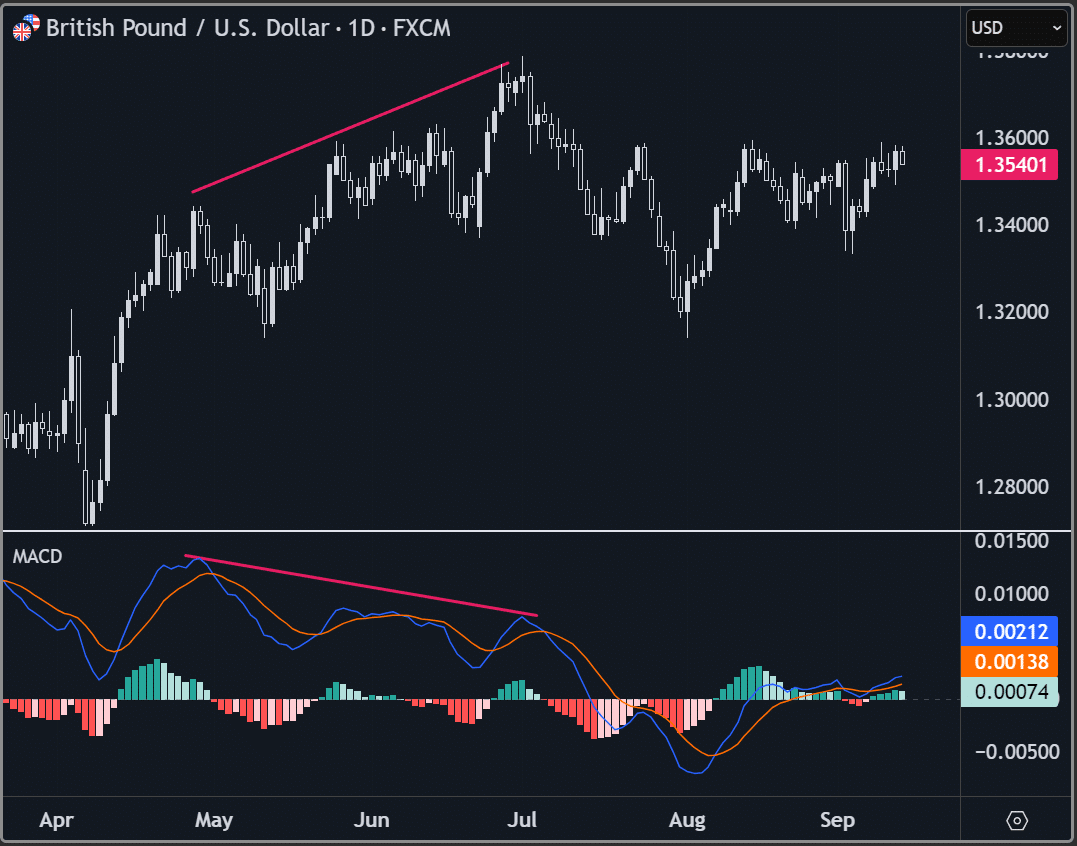
- Use crossovers only with the dominant trend (e.g., price above 200 SMA → only take bullish crossovers).
- Watch the histogram. Shrinking bars in a strong trend often warn of momentum fading.
- Combine with Bollinger Bands: wait for a squeeze, then confirm breakout with a widening MACD histogram.
- Great as a confirmation tool, not a standalone trigger.
6. Average True Range (ATR)
The Average True Range doesn’t care about direction. It measures pure volatility — how much price actually moves, on average, over a set number of periods (default = 14).
Formula: it looks at the greatest of:
- Current high – current low
- |Current high – previous close|
- |Current low – previous close|
… then averages it out.
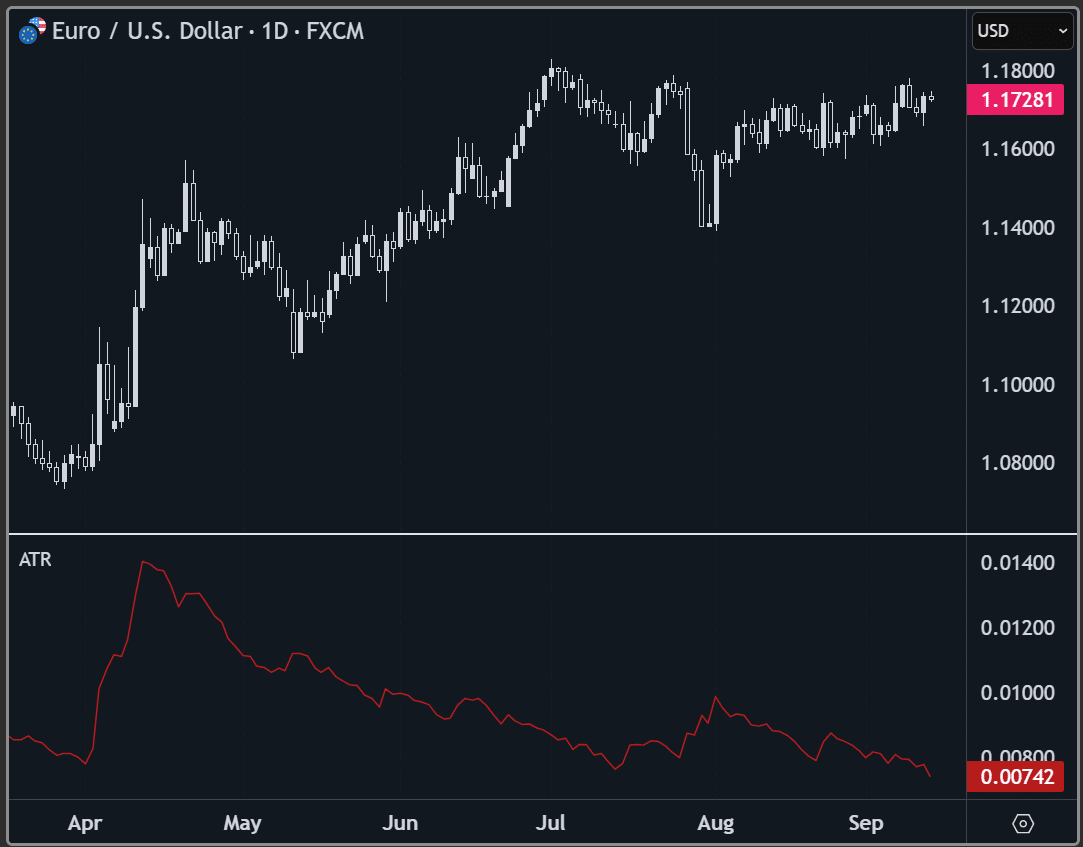
So while most indicators tell you “up or down,” ATR tells you “fast or slow.”
Why it’s useful:
- Risk management: ATR gives you a volatility-adjusted stop-loss. Instead of picking random pips, you size your stop as 1.5x or 2x ATR.
- Position sizing: ATR helps scale lot sizes based on volatility — smaller size in volatile markets, bigger in quiet markets.
- Breakout filter: when ATR expands from compressed levels, the market is waking up.
What kills traders:
- Ignoring volatility completely. Using a fixed 20-pip stop regardless of ATR is suicide — sometimes that’s too tight, sometimes too loose.
- Thinking ATR predicts direction. It doesn’t — it just says “things are moving more” or “things are dead.”
- Overcomplicating it. ATR is a tool for risk, not a crystal ball.
How to actually use it:
- Stop placement: Use 1.5–2x ATR beyond a swing high/low for natural breathing room.
- Trail stops: Adjust exits as ATR contracts/expands so you don’t choke your trade.
- Breakout confirmation: Don’t chase every breakout. If ATR is low and expanding, the move has real juice. If ATR is high and shrinking, momentum is dying.
- Combine ATR with trend tools (MAs, ADX) — ATR tells you how much room to give your trade, not when to enter.
7. Ichimoku Cloud
The Ichimoku Cloud (Ichimoku Kinko Hyo) looks messy at first glance, but it’s one of the most powerful all-in-one indicators. It was designed by a Japanese journalist to give traders everything they need in a single glance: trend, momentum, and support/resistance.
It consists of five lines:
- Tenkan-sen (Conversion line): short-term momentum (9 periods).
- Kijun-sen (Base line): medium-term momentum (26 periods).
- Senkou Span A & B (the Cloud): projected support/resistance zones, shifted 26 periods forward.
- Chikou Span (Lagging line): current close plotted 26 periods back, used as confirmation.
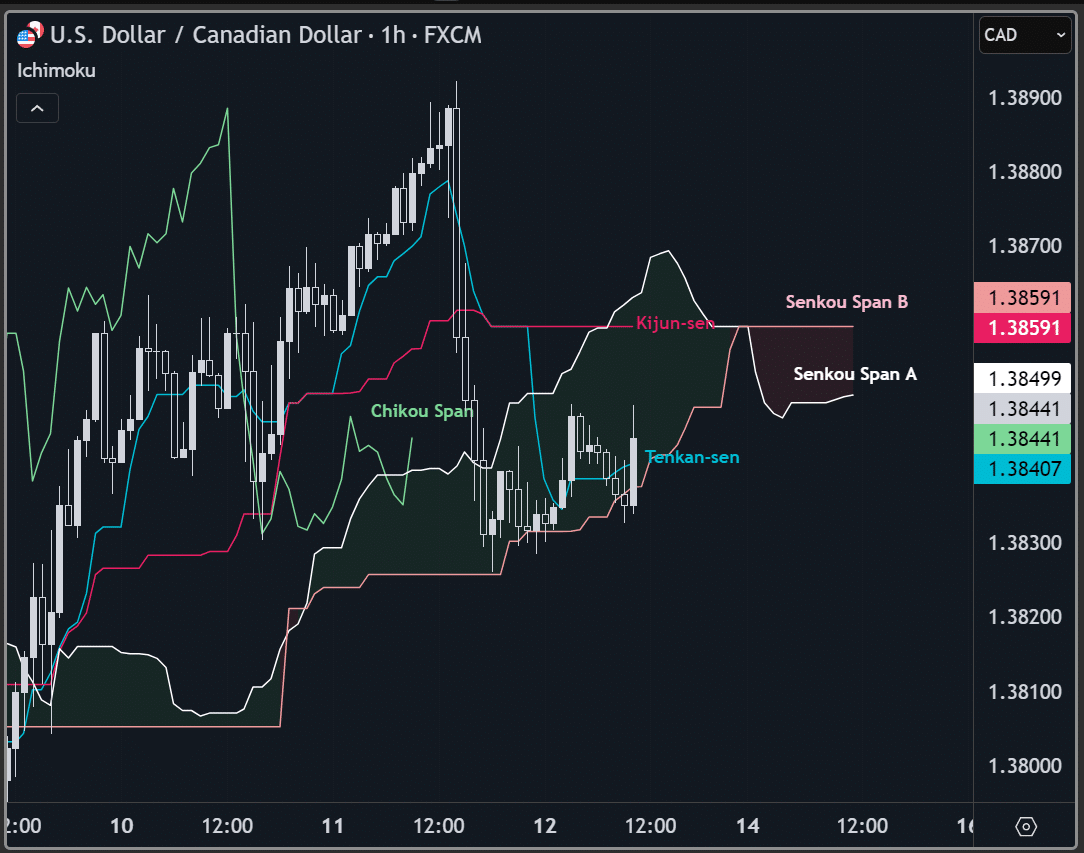
When the cloud is green and price is above it → bullish bias. When the cloud is red and price is below it → bearish bias.
Why it’s useful:
- Combines trend direction, momentum, and support/resistance in one chart.
- Cloud zones act like dynamic areas of support/resistance.
- Great for trend continuation setups — pullbacks into the cloud often launch the next leg.
- Gives a “yes/no” clarity at a glance: either everything lines up or it doesn’t.
What kills traders:
- Trying to trade every crossover. The indicator throws a lot of signals; most are noise without context.
- Using it in tight ranges. Clouds flatten, signals contradict, and you get chopped up.
- Overcomplicating it. Ichimoku is best when you keep rules simple.
How to actually use it:
- Trend confirmation: only trade long when price is above the cloud, Tenkan > Kijun, and Chikou above price. Flip rules for shorts.
- Pullback entries: enter when price dips into the cloud in a strong trend and bounces back out.
- Breakout confirmation: a breakout backed by a bullish cloud twist is higher probability.
- Best paired with ATR or ADX to filter out weak conditions.
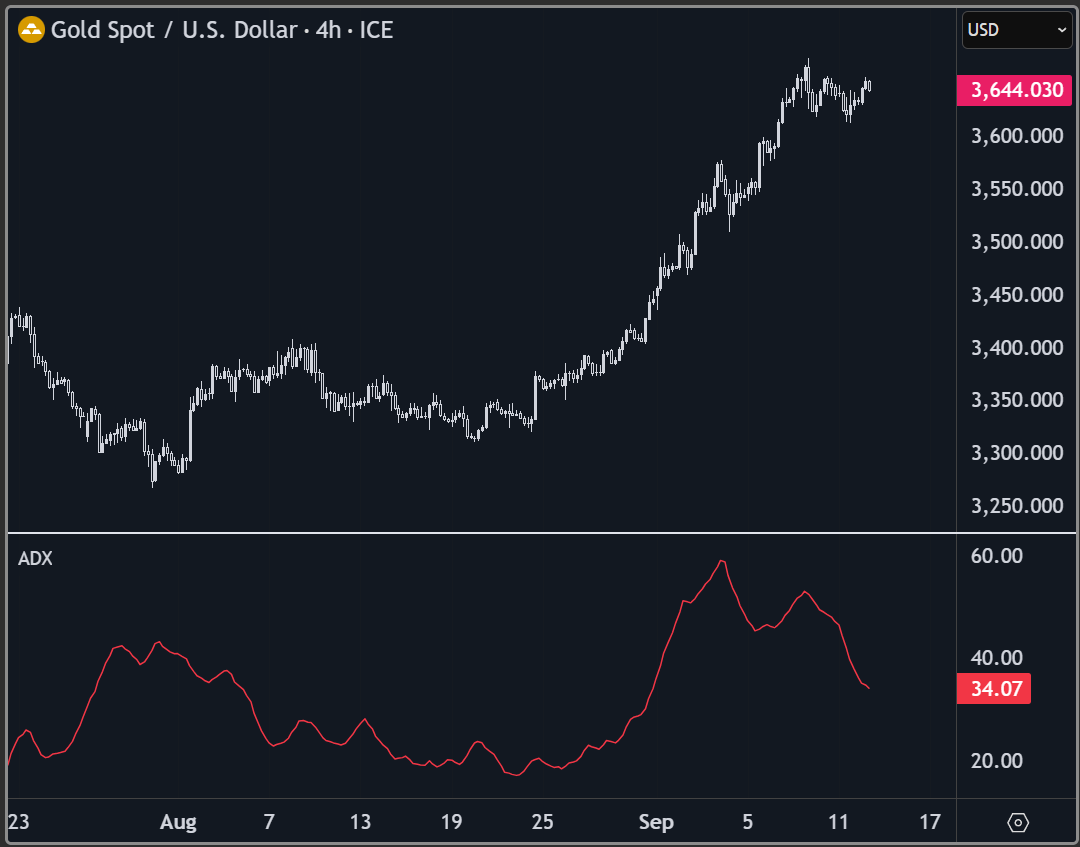
8. Average Directional Index (ADX)
The Average Directional Index measures trend strength, not direction. It comes with two helper lines:
- +DI (positive directional index): strength of upward moves.
- –DI (negative directional index): strength of downward moves.
- ADX line: overall strength of the trend, calculated from the difference between +DI and –DI (default = 14).
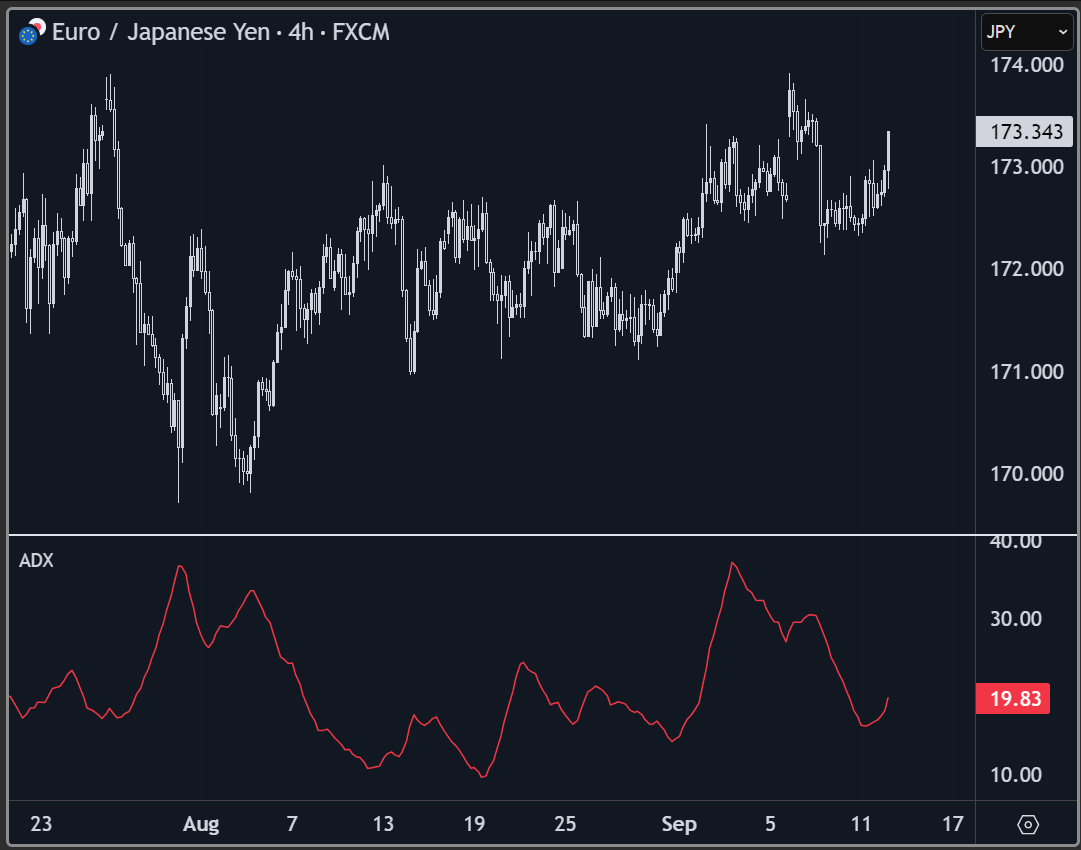
Numbers matter:
- Below 20 → weak / ranging market.
- 20–25 → trend is forming.
- 25–40 → strong trend.
- 40+ → very strong trend (but often near exhaustion).
Why it’s useful:
- Cuts out the guesswork — tells you if the market is worth trending with or if it’s just chop.
- Helps filter strategies: trend-following systems when ADX > 25, range plays when ADX < 20.
- Confirms breakout strength. A rising ADX after consolidation = trend is real.
What kills traders:
- Misreading direction. ADX doesn’t say “up or down” — it just says “strong or weak.” Direction comes from +DI vs. –DI or other tools.
- Chasing high ADX blindly. By the time it spikes above 40, the move is often mature.
- Using it alone. Without MAs or structure, it doesn’t tell you where to trade.
How to actually use it:
- Trend filter: only run trend-following plays (MAs, breakouts, Ichimoku) when ADX > 25. Below that, fade ranges with oscillators like RSI or Stochastic.
- Direction: check whether +DI > –DI (bullish bias) or the reverse (bearish bias).
- Breakout confirmation: pair with Bollinger squeeze or price structure. Rising ADX after breakout = confirmation.
- Avoid chop: flat ADX = stay out. That alone saves accounts
9. Pivot Points
Pivot Points are mathematical levels derived from the previous session’s high, low, and close. Traders use them to project intraday support and resistance zones.
The formula for the central pivot:
- Pivot = (High + Low + Close) ÷ 3
From there you get:
- R1, R2, R3 (resistance levels)
- S1, S2, S3 (support levels)
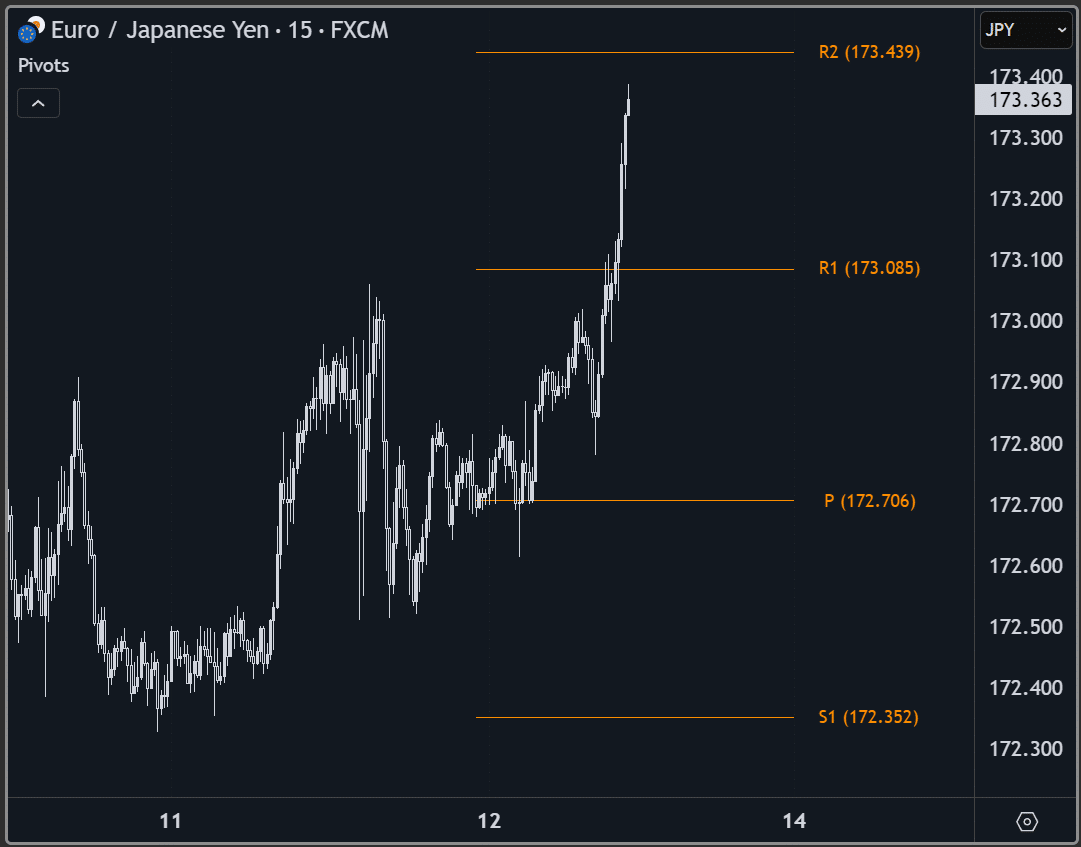
These levels reset daily (or weekly/monthly depending on your chart). They’re not magic — but because so many traders watch them, they often act like self-fulfilling magnets for price.
Why it’s useful:
- Instant map of likely intraday battle zones.
- Gives you objective levels to plan entries/exits around.
- Excellent for day traders who need structure at the start of each session.
What kills traders:
- Treating pivots as automatic buy/sell signals. They’re levels, not instructions.
- Ignoring context — pivot points are stronger when they line up with other factors (trend direction, ATR, or higher timeframe support/resistance).
- Overloading your chart with too many pivot calculations (daily + weekly + monthly) until you can’t see price anymore.
How to actually use it:
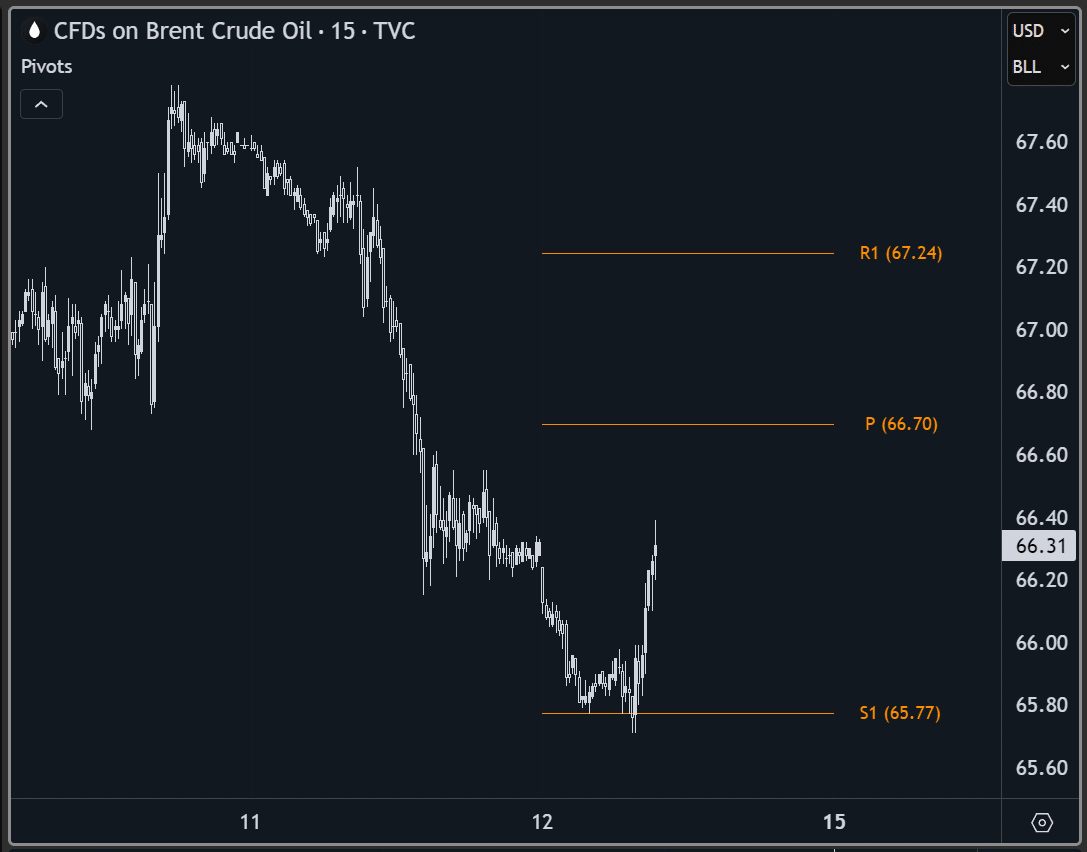
- Bias filter: above the daily pivot = bullish tilt, below = bearish tilt.
- Confluence play: if R1 lines up with a prior swing high and RSI divergence, that’s a much stronger short than pivot alone.
- Breakout play: when ATR is expanding and price breaks through a pivot with momentum, the next pivot level often becomes the target.
- Risk management: pivots make logical stop placement zones just beyond S/R levels.
FAQ
1. What are the best forex indicators for beginners?
Start simple. Use Moving Averages (to see trend), RSI (to see momentum), and Bollinger Bands (to see volatility). That’s enough to build a real system without drowning in signals.
2. What’s the most accurate indicator?
None. There’s no “holy grail.” The pros win by combining tools for confluence: e.g., trend filter (200 SMA) + momentum check (RSI) + volatility filter (ATR). The accuracy comes from stacking edges, not chasing unicorns.
3. Which indicator settings should I use?
Default works 90% of the time.
- RSI-14
- ATR-14
- Bollinger 20/2
- MACD 12-26-9
- ADX-14
Tweak later only after forward-testing in live markets. Backtest tweaks often lie.
4. Can I trade with indicators only?
No. Indicators are support tools, not a system. You still need:
- Market structure (support/resistance, trendlines).
- Risk rules (ATR-based stops, position sizing).
- Discipline (journaling and execution).
Indicators tell you the “weather.” You still have to decide if you go outside.
5. What’s the difference between leading and lagging indicators?
- Leading indicators (like Stochastic, RSI, Fibonacci) try to hint at potential turning points.
- Lagging indicators (like Moving Averages, MACD, ADX) confirm moves after they’re already in play.
Smart traders don’t obsess — they use both to frame context.
6. How many indicators should I use at once?
Three is plenty. More than that and you’re just collecting opinions. The trick is combining different types (trend + momentum + volatility/levels). Example: 200 SMA + RSI + ATR. That gives you direction, timing, and risk.
7. Are indicators better on higher or lower timeframes?
Indicators don’t care about timeframes — but noise does. On a 1-minute chart, RSI will scream overbought 50 times a day. On the daily, it tells you when the trend is truly stretched. Beginners should start with 4H and Daily to learn real context before scalping.
8. What indicators do professional traders actually use?
Pros keep it boring. MAs, RSI, MACD, ATR, Pivot Points. The difference isn’t the tool — it’s the execution. They size correctly, cut losers fast, and don’t revenge trade. That’s the real “indicator” of professionalism.
9. Do indicators work in news events?
No. During NFP, CPI, or central bank decisions, indicators get steamrolled. ATR spikes, spreads widen, and your “perfect” setup is meaningless. Rule of thumb: flatten positions before major news unless you’re experienced in trading the chaos.
10. How do I know if an indicator is helping or hurting me?
Simple: track it. In your trading journal, mark every trade with the indicators used. After 50+ trades, see if it actually improves your win rate or expectancy. If not, cut it. Most traders don’t have too few indicators — they have too many useless ones.
If you’re still searching for the “perfect indicator,” stop. It doesn’t exist. The edge isn’t in the tool — it’s in how you use it. Professionals don’t chase holy grails. They use simple tools with ruthless discipline.
Learn these nine. Test them. Journal them. Apply them in the right market regime. That’s how you go from guessing to executing with confidence.
And if you want to go deeper — where we don’t just talk indicators but build full trading frameworks, manage risk like hedge funds, and actually scale accounts — then plug into The Trading Brief or join our next live challenge. Because reading is step one. Doing the work is step two.



0 Comments